TRAIN TRACK® Web Edition Help Manual
Automatic Email Notices
Automatic email may be set up from the TRAIN TRACK® client or the web interface. If you have both the client and the web interface, we recommend setting up automatic email from the client interface.
NOTE: If you have a HOSTED edition, we will set up automatic email for you, just let us know when you are ready to have it turned on.
Install AspEmail
Automatic email from the web interface requires AspEmail which must be installed on your server. This is a third-party application, and not part of TRAIN TRACK®.
This is a free component available from AspEmail.com. Note that there is also a paid version, and the website does not make it clear that you may use the version you download free of charge if you do not need authentication. For more information, see the link.
Follow the instructions on their website for installing this component.
Configure Automatic Email
To set up your application to send automatic email notices, you need to configure your email server. This is the mail server that will be used to send the email notices when your program is in use.
To configure your server, follow these steps
-
From the menu bar, select Report/Send > Automatic Email.
-
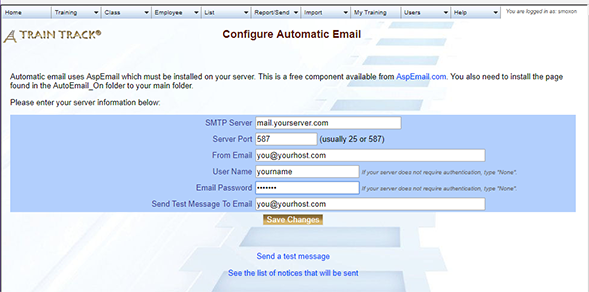
The mail server configuration screen will open.
-
Type in the SMTP Server you plan to use for sending email (for example, SMTP.YourDomain.com).
-
Type in your Server Port (usually 25 or 587).
-
Type in the User login name for the email account you plan to use to send notices. This can be an existing email account, or you can create one for sending automatic notices.
-
Type in the Password used to access the email account.
-
Type in an Email Address to send a test message to.
-
Click Save Changes.
Send a Test Message
To make sure your settings are correct, you may send a test message to the address you entered for "Send Test Message To Email" as described above. Once you receive the test email, you will know that your mail server is configured correctly, and you are ready to install the automatic email feature as described below.
To send a test message, follow these steps
-
From the menu bar, select Report/Send > Automatic Email.
2. click the link Send a Test Message. A test email will automatically be sent
Install the Automatic Email Trigger
Once you have configured and tested your mail server, you may install the automatic email trigger.
To install the automatic email trigger, follow these steps
1. Locate the folder Login_autoemail_on.
2. Move the file "Login.asp" from that folder to your main folder.
To turn off the automatic email trigger, follow these steps
1. Locate the folder Login_autoemail_off.
2. Move the file "Login.asp" from that folder to your main folder.